728x90

본 게시글은 인프런 subicura 강사님의 초보를 위한 쿠버네티스 안내서 강의 수강 후 작성한 내용입니다.
Service
- Pod은 자체 IP를 가지고 다른 Pod과 통신할 수 있지만, 쉽게 사라지고 생성되는 특징 때문에 직접 통신하는 방법은 권장하지 않는다.
- 쿠버네티스는 Pod과 직접 통신하는 방법 대신, 별도의 고정된 IP를 가진 서비스를 만들고 그 서비스를 통해 Pod에 접근하는 방식을 사용한다.
- 노출 범위에 따라 CluterIP, NodePort, LoadBalancer 타입으로 나눈다.
Service(ClusterIP)
- CluterIP는 클러스터 내부에서만 접근할 수 있다.

apiVersion: apps/v1
kind: Deployment
metadata:
  name: redis
spec:
  selector:
    matchLabels:
      app: counter
      tier: db
  template:
    metadata:
      labels:
        app: counter
        tier: db
    spec:
      containers:
        - name: redis
          image: redis
          ports:
            - containerPort: 6379
              protocol: TCP

---
apiVersion: v1
kind: Service
metadata:
  name: redis
spec:
  ports:
    - port: 6379
      protocol: TCP
  selector:
    app: counter
    tier: db
구분자: 하나의 YAML파일에 여러 개의 리소스를 정의할 땐 "---"를 구분자로 사용한다.
CluterIP 서비스 옵션
| spec.ports.port | 서비스가 생성할 Port |
| spec.ports.targetPort | 서비스가 접근할 Pod의 Port (기본: port랑 동일) |
| spec.selector | 서비스가 접근할 Pod의 label 조건 |
counter app Pod에서 redis Pod으로 접근이 되는지 테스트 해본다.
$ kubectl apply -f counter-app.yml

# counter app에 접근
$ kubectl get po
$ kubectl exec -it counter-<xxxxx> -- sh

# curl localhost:3000
# curl localhost:3000
# telnet redis 6379
  dbsize
  KEYS *
  GET count
  quit
Service를 통해 Pod과 성공적으로 연결됨을 확인한다.
$ kubectl get endpoints
$ kubectl get ep #줄여서

# redis Endpoint 확인
$ kubectl describe ep/redis
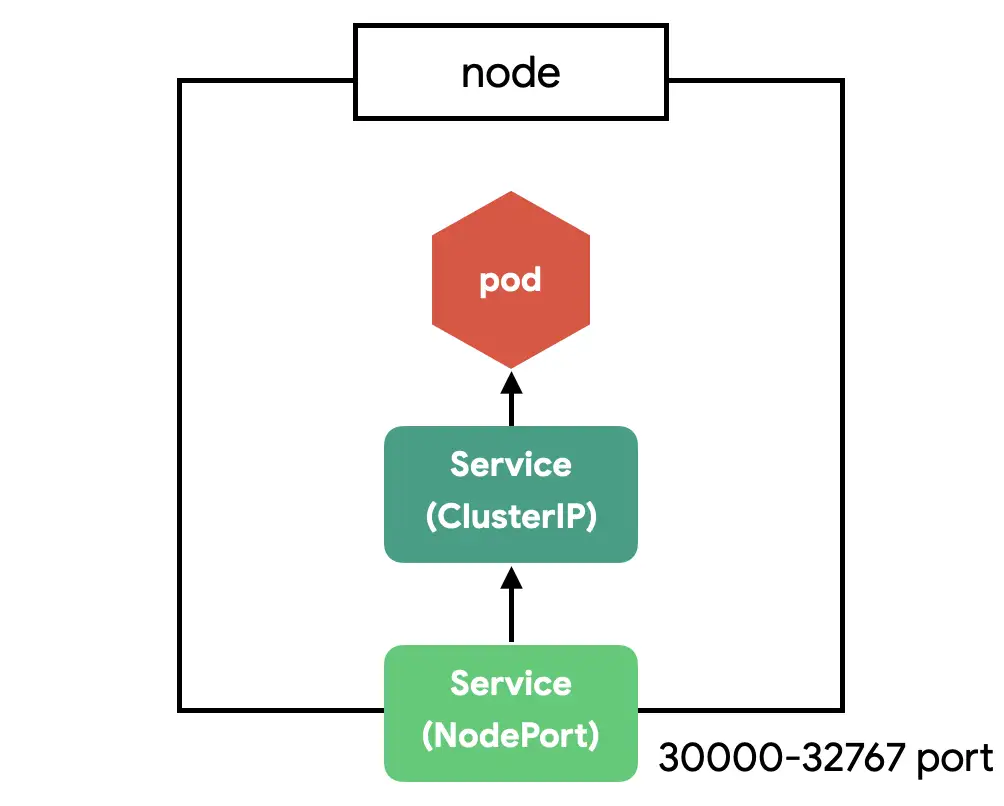
Service(NodePort)
- CluterIP는 클러스터 내부에서만 접근할 수 있다.
- 클러스터 외부(노드)에서 접근할 수 있도록 NodePort 서비스를 사용한다.


apiVersion: v1
kind: Service
metadata:
  name: counter-np
spec:
  type: NodePort
  ports:
    - port: 3000
      protocol: TCP
      nodePort: 31000
  selector:
    app: counter
    tier: app
정의 설명
| spec.ports.nodePort | 노드에 오픈할 Port (미지정시 30000-32768 중에 자동 할당) |
counter app을 해당 노드의 31000으로 오픈한다.
$ kubectl apply -f counter-nodeport.yml

# 서비스 상태 확인
kubectl get svc
minikube ip로 테스트 클러스터의 노드 IP를 구하고 31000으로 접근한다.
 $ curl 192.168.64.4:31000 # 또는
 <http://192.168.64.4:31000> # 브라우저에서 접근한다.
Service(LoadBalancer) 만들기
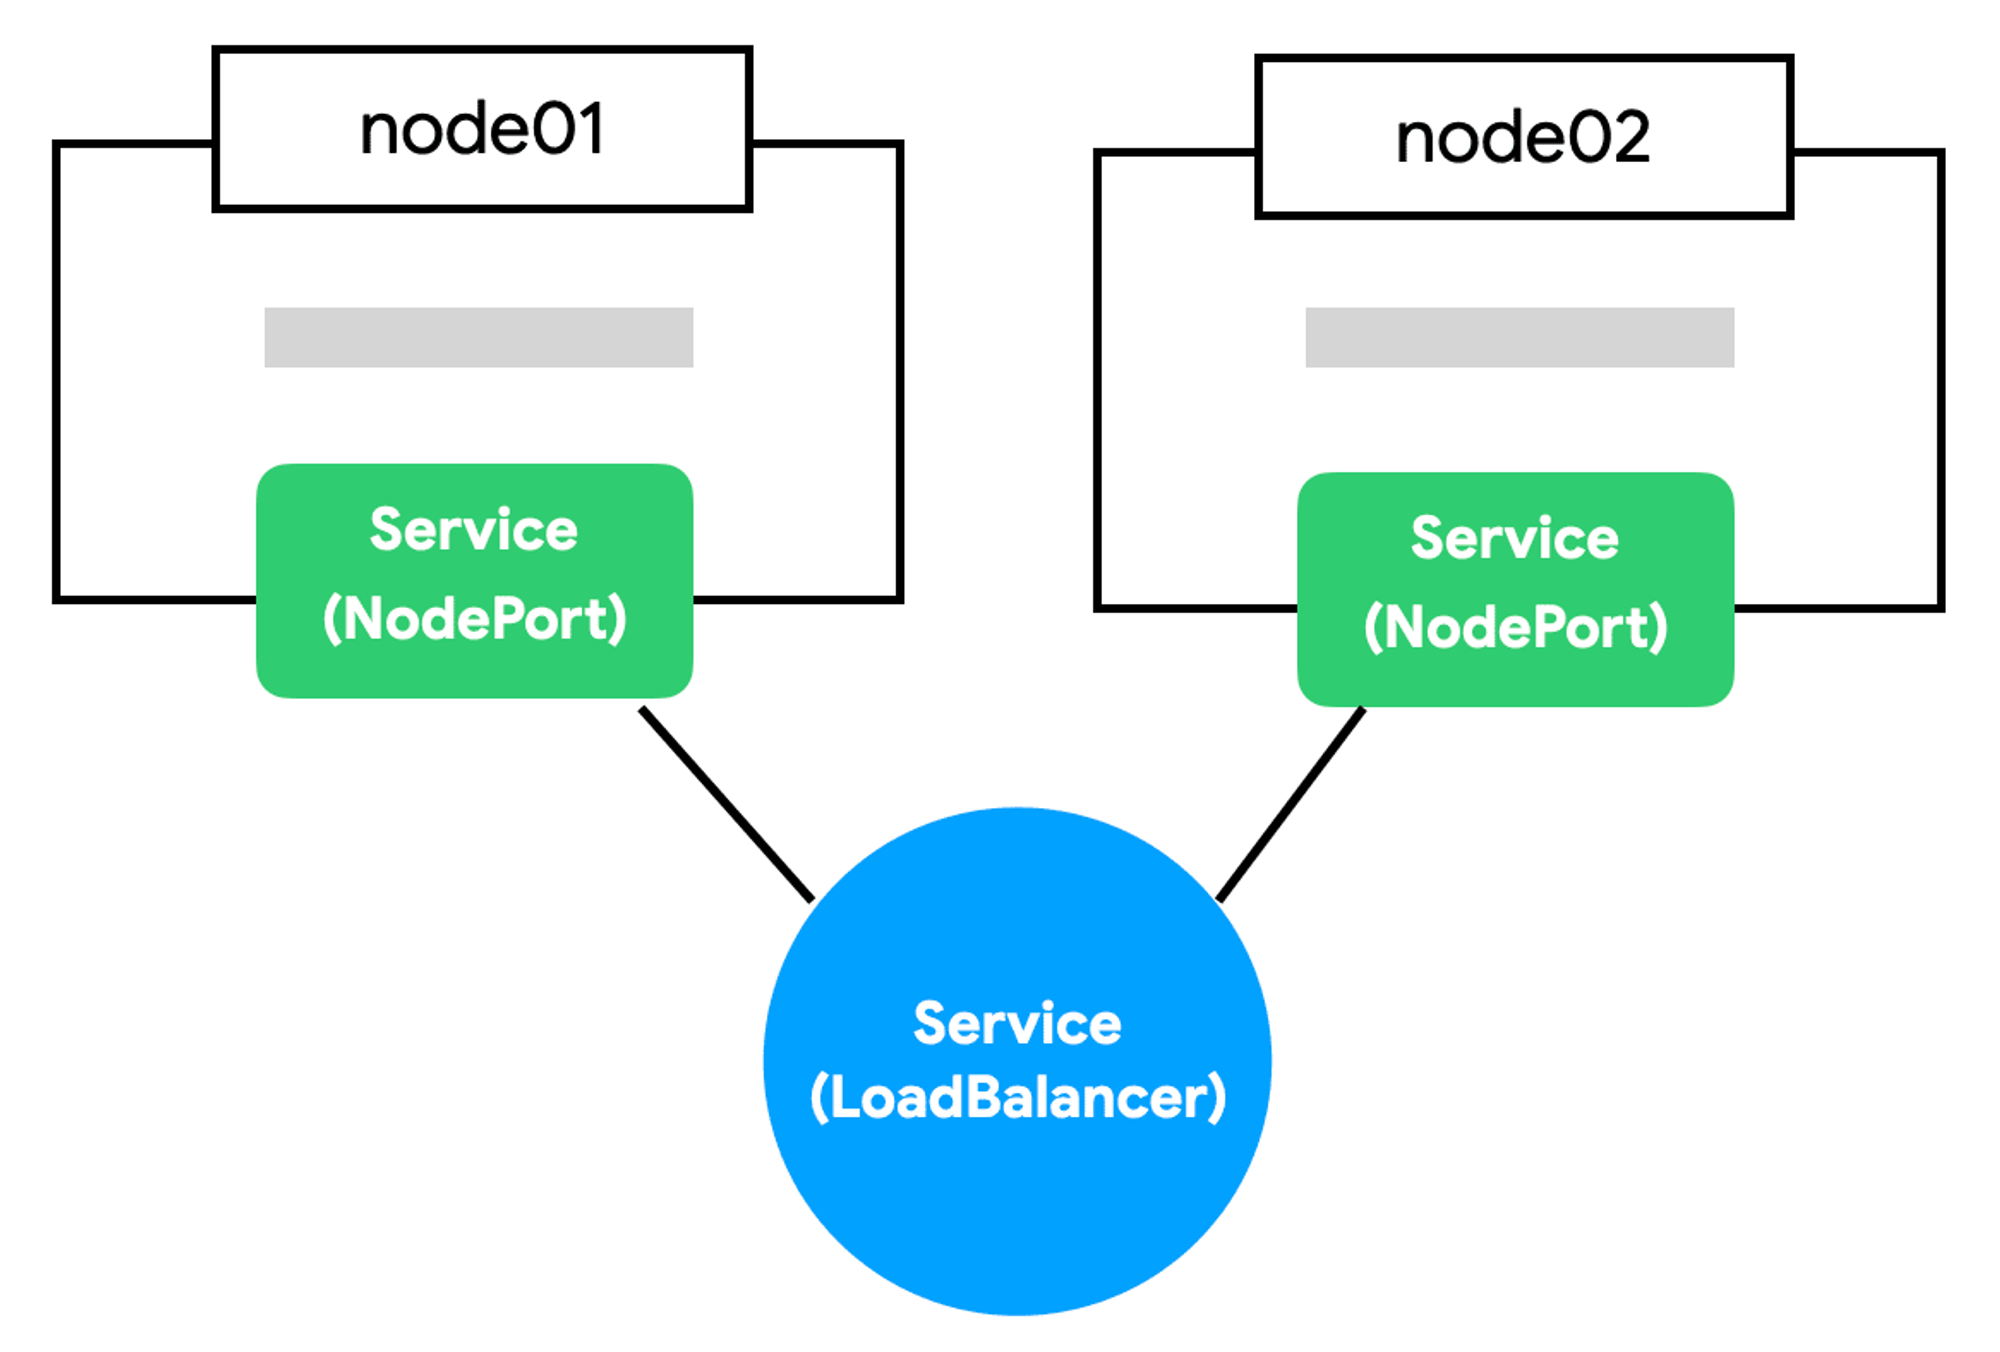
- NodePort의 단점은 노드가 사라졌을 때 자동으로 다른 노드를 통해 접근이 불가능하다는 점이다.
- 예를 들어, 3개의 노드가 있다면 3개 중에 아무 노드로 접근해도 NodePort로 연결할 수 있지만 어떤 노드가 살아 있는지는 알 수가 없다.
- 자동으로 살아 있는 노드에 접근하기 위해 모든 노드를 바라보는 Load Balancer가 필요하다.
- 브라우저는 NodePort에 직접 요청을 보내는 것이 아니라 Load Balancer에 요청하고 Load Balancer가 알아서 살아 있는 노드에 접근하여 NodePort의 단점을 제거한다.

apiVersion: v1
kind: Service
metadata:
  name: counter-lb
spec:
  type: LoadBalancer
  ports:
    - port: 30000
      targetPort: 3000
      protocol: TCP
  selector:
    app: counter
    tier: app
ingress
- Ingress는 클러스터 외부에서 내부 서비스로 HTTP 및 HTTPS 경로를 통해 접근을 제어하는 방법이다.
- Ingress는 특정 URL 경로 또는 호스트 이름을 기반으로 트래픽을 라우팅하며, 부하 분산, SSL 종단, 이름 기반 가상 호스팅 등을 제공할 수 있다.
- Ingress를 사용하면 여러 서비스에 대한 접근을 하나의 IP 주소와 도메인 이름으로 관리할 수 있다. 이는 특히 여러 서비스를 운영하는 환경에서 매우 유용하다.
apiVersion: networking.k8s.io/v1
kind: Ingress
metadata:
  name: echo-v1
spec:
  rules:
    - host: v1.echo.192.168.64.5.sslip.io
      http:
        paths:
          - path: /
            pathType: Prefix
            backend:
              service:
                name: echo-v1
                port:
                  number: 3000

---
apiVersion: apps/v1
kind: Deployment
metadata:
  name: echo-v1
spec:
  replicas: 3
  selector:
    matchLabels:
      app: echo
      tier: app
      version: v1
  template:
    metadata:
      labels:
        app: echo
        tier: app
        version: v1
    spec:
      containers:
        - name: echo
          image: ghcr.io/subicura/echo:v1
          livenessProbe:
            httpGet:
              path: /
              port: 3000

---
apiVersion: v1
kind: Service
metadata:
  name: echo-v1
spec:
  ports:
    - port: 3000
      protocol: TCP
  selector:
    app: echo
    tier: app
    version: v1
Volume (local)
- 지금까지 만들었던 컨테이너는 Pod을 제거하면 컨테이너 내부에 저장했던 데이터도 모두 사라진다.
- MySQL과 같은 데이터베이스는 데이터가 유실되지 않도록 반드시 별도의 저장소에 데이터를 저장하고 컨테이너를 새로 만들 때 이전 데이터를 가져와야 한다.
- 쿠버네티스는 Volume을 이용하여 컨테이너의 디렉토리를 외부 저장소와 연결하고 다양한 플러그인을 지원하여 흔히 사용하는 대부분의 스토리지를 별도 설정없이 사용할 수 있다.
empty-dir
: 컨테이너 내부 공유
apiVersion: v1
kind: Pod
metadata:
  name: sidecar
spec:
  containers:
    - name: app
      image: busybox
      args:
        - /bin/sh
        - -c
        - >
          while true;
          do
            echo "$(date)\\n" >> /var/log/example.log;
            sleep 1;
          done
      volumeMounts:
        - name: varlog
          mountPath: /var/log
    - name: sidecar
      image: busybox
      args: [/bin/sh, -c, "tail -f /var/log/example.log"]
      volumeMounts:
        - name: varlog
          mountPath: /var/log
  volumes:
    - name: varlog
      emptyDir: {}
hostpath
: 호스트 폴더와 공유
apiVersion: v1
kind: Pod
metadata:
  name: host-log
spec:
  containers:
    - name: log
      image: busybox
      args: ["/bin/sh", "-c", "sleep infinity"]
      volumeMounts:
        - name: varlog
          mountPath: /host/var/log
  volumes:
    - name: varlog
      hostPath:
        path: /var/log
ConfigMap
- 컨테이너에서 설정 파일을 관리하는 방법은 이미지를 빌드할 때 복사하거나, 컨테이너를 실행할 때 외부 파일을 연결하는 방법이 있다.
- 쿠버네티스는 ConfigMap으로 설정을 관리한다.
global:
  scrape_interval: 15s

scrape_configs:
  - job_name: prometheus
    metrics_path: /prometheus/metrics
    static_configs:
      - targets:
          - localhost:9090
먼저, ConfigMap을 만들고 --from-file 옵션을 이용하여 file을 설정으로 만든다.
# ConfitMap 생성 (configmap == cm)
$ kubectl create cm my-config --from-file=config-file.yml

# ConfitMap 조회
$kubectl get cm

# ConfigMap 내용 상세 조회
$ kubectl describe cm/my-config
생성한 ConfigMap을 /etc/config 디렉토리에 연결한다.
apiVersion: v1
kind: Pod
metadata:
  name: alpine
spec:
  containers:
    - name: alpine
      image: alpine
      command: ["sleep"]
      args: ["100000"]
      volumeMounts:
        - name: config-vol
          mountPath: /etc/config
  volumes:
    - name: config-vol
      configMap:
        name: my-config
volume을 연결하여 배포하고 확인한다.
$ kubectl apply -f alpine.yml

# 접속 후 설정 확인
$ kubectl exec -it alpine -- ls /etc/config
$ kubectl exec -it alpine -- cat /etc/config/config-file.yml
Secret
- 쿠버네티스는 ConfigMap과 유사하지만, 보안 정보를 관리하기 위해 Secret을 별도로 제공한다.
- ConfigMap과 차이점은 데이터가 base64로 저장된다는 점이다.
# secret 생성
$ kubectl create secret generic db-user-pass --from-file=./username.txt --from-file=./password.txt

# secret 상세 조회
$ kubectl describe secret/db-user-pass

# -o yaml로 상세 조회
$ kubectl get secret/db-user-pass -o yaml

# 저장된 데이터 base64 decode
$ echo 'MXEydzNlNHI=' | base64 --decode
설정한 Secret을 환경변수로 연결한다.
apiVersion: v1
kind: Pod
metadata:
  name: alpine-env
spec:
  containers:
    - name: alpine
      image: alpine
      command: ["sleep"]
      args: ["100000"]
      env:
        - name: DB_USERNAME
          valueFrom:
            secretKeyRef:
              name: db-user-pass
              key: username.txt
        - name: DB_PASSWORD
          valueFrom:
            secretKeyRef:
              name: db-user-pass
              key: password.txt
배포 후 환경변수를 확인한다.
$ kubectl apply -f alpine-env.yml

# env 확인
$ kubectl exec -it alpine-env -- env
참고사이트
- https://subicura.com/k8s/guide/service.html
- https://subicura.com/k8s/guide/ingress.html#ingress-만들기
- https://subicura.com/k8s/guide/local-volume.html
- https://subicura.com/k8s/guide/configmap.html
- https://subicura.com/k8s/guide/secret.html
728x90
'System > Server' 카테고리의 다른 글
| [Docker] Docker Private Image Registry (0) | 2025.04.10 |
|---|---|
| [Kube] Kubernetes - Deployment (6) (2) | 2024.07.22 |
| [Kube] Kubernetes - Pod (5) (2) | 2024.07.22 |
| [Kube] Kubernetes - kubectl 명령어 (4) (2) | 2024.07.19 |
| [Kube] Kubernetes - 실습 환경 구성 (3) (2) | 2024.07.16 |